Showing posts with label cake. Show all posts

Sunday, September 14, 2014

Nutty Graham Picnic Cake


Take photos of your work. Take photos of your work. Take photos of your work.

You'd think that after writing this blog for a couple of years I'd remember to take photos of everything I make, but I don't. Sometimes, as in this case, I took photos of the process and then forgot to take a photo of the final product.

So what you see here is the photo of the last, lonely piece of cake; the cake that I made for my Mother-in-Law's birthday. This cake and I go way back. I think the first time my Mom made it I was around 8 years old or so. This cake became one of our standard family recipes for many reasons, not the least of which is that it's delicious. It's also easy to make, and pretty too because it's made in a bundt pan and it has a lovely glaze on top. Having said all of this, I had never made this cake for my husband or kids or husband's family until just this month - and my husband and I are about to celebrate 20 years together so that is pretty remarkable indeed.

So here's how it happened...I was looking through a box of old photos recently and came across one of my Mom, brother, and me sitting at the kitchen table with this beautiful cake in front of us. I looked closely - could it be? Yes! The Nutty Graham Picnic Cake!!! How had I forgotten all about this beauty?   I put the photo up on the fridge to remind me - next time you need a cake, make this one.

Fast forward to early this month - my Mother-in-Law's birthday. Just the night before I had made another old family recipe, Sour Cream Chocolate Cake, for a dinner we were going to. It was so crazy rich and delicious I actually couldn't even consider having another chocolate cake this night. It was over the top and simply should not be repeated two days in a row. What to make that isn't chocolate? And then I glanced at the fridge and saw the photo. And that was it - to the grocery store for some graham cracker crumbs and orange juice!

As you may have noticed in the title of this recipe, the word 'graham' appears. That's because there are graham cracker crumbs in the batter! You are probably used to using graham cracker crumbs for the crusts of pies and squares, but you are likely similar to me in that in all my years of baking I have never seen graham cracker crumbs inside the cake itself (other than this recipe obviously). The other complimentary ingredient in this cake is orange juice. The juice (and rind) help to cut the sweetness of the cake and give it a certain je ne sais quois.

Since I hadn't made this cake in about 25-30 years I decided to make no substitutions or adjustments just to see what it tasted like the way the author intended it to be. The second time I made it (the next day), I cut back on the sugar. I didn't really notice any difference. I also left the nuts out since I was making this second cake for my kids to take to school (and the school is a nut-free zone).

This delicious cake recipe is from a mini magazine called America's Bake Off and it was published by Pillsbury in 1978. The funny thing about this mini magazine is that almost every single recipe starts with "Take a XXX cake mix and add XXX...". Not typically my kind of recipe source. However, this cake recipe is totally from scratch and doesn't involve any boxed mixes.

Here is what the cake looks like in the mini magazine:
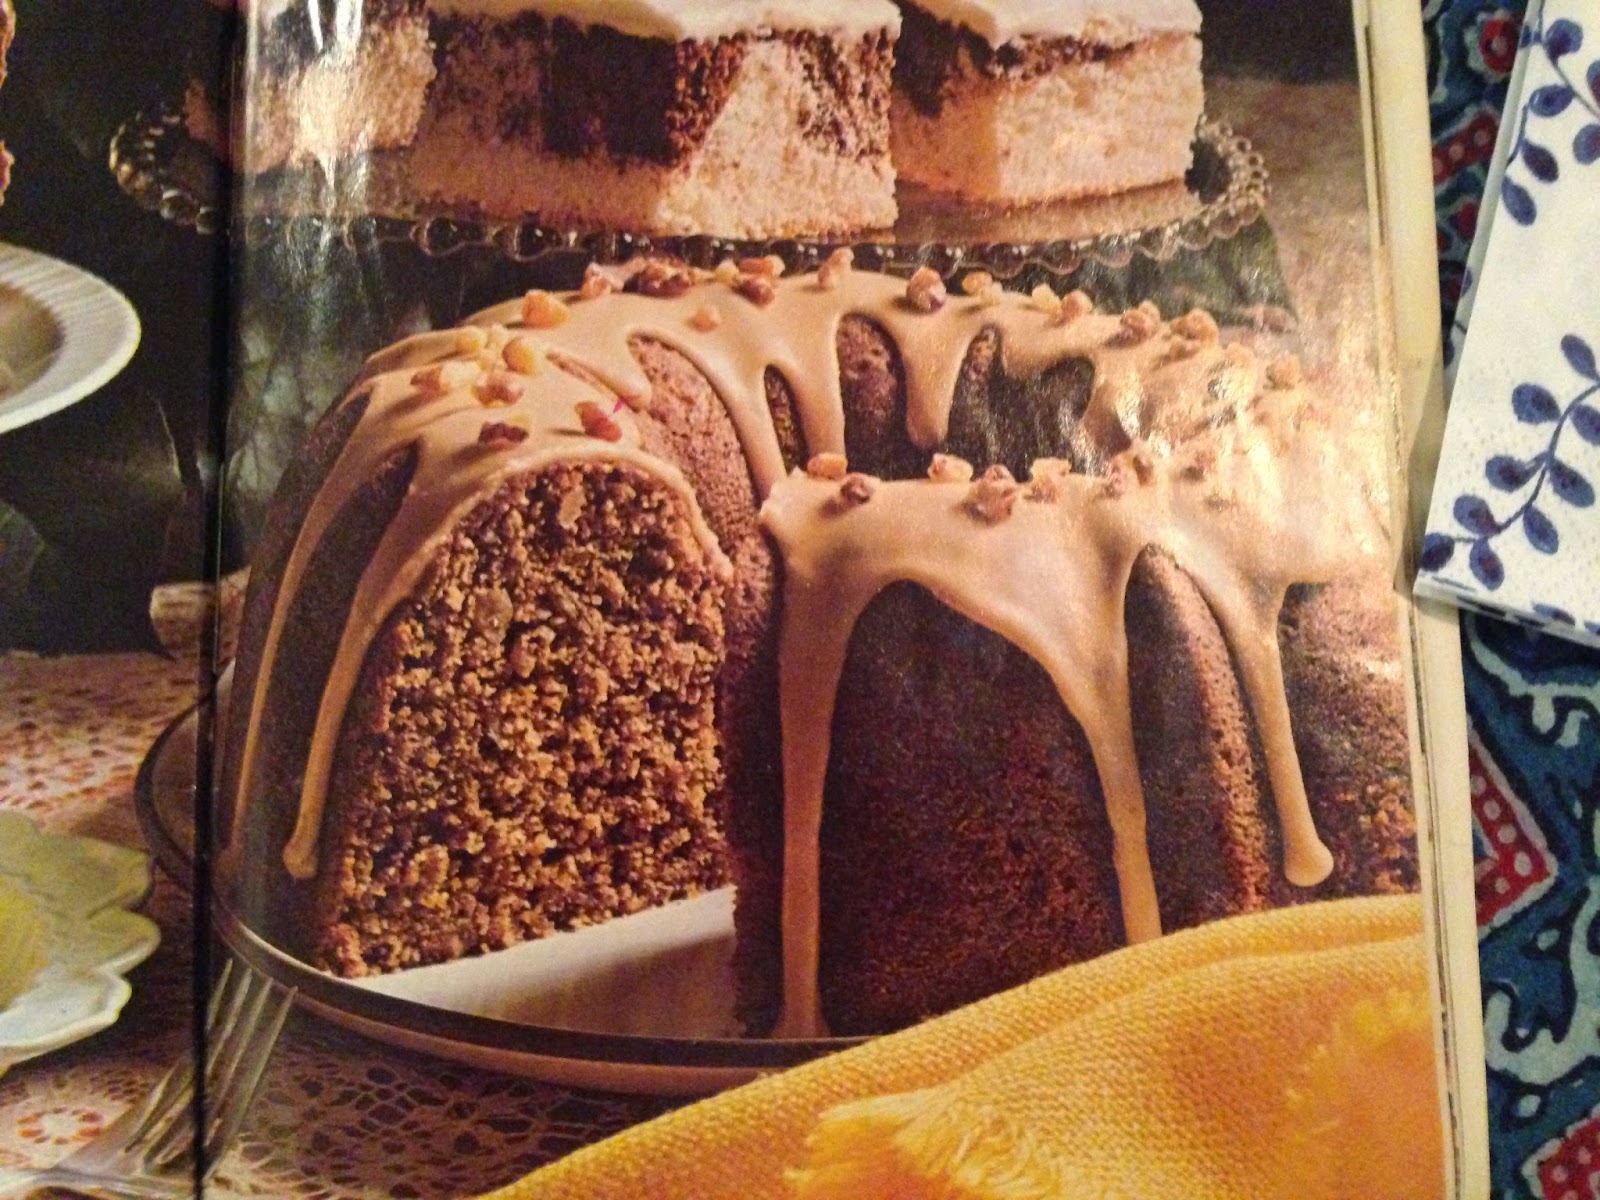


And here is the photo that inspired me:


So you can see that it IS actually possible to make a cake that looks as good as the professional photo in a cook book.

Without further ado, here is the recipe for the now infamous Nutty Graham Picnic Cake. Instead of re-typing the recipe I am going to show it to you since I especially love the little blurb about Mrs. Esther Tomich of San Pedro, California.


The only changes I made were to put the ingredients in the bowl in a specific order, and beat after each addition. As well, for my Mother-in-Law's birthday cake I used pecans instead of walnuts because that's what I had on hand.

Here are the ingredients in the order I prepared them:

CAKE

1 cup butter
1 cup firmly packed brown sugar
1/2 cup sugar (I left this out of the second cake entirely)
3 eggs
1 cup orange juice
1 tbsp grated orange rind
2 cups all purpose flour
1 cup graham cracker crumbs (14 crackers)
1/2 tsp cinnamon
1 tsp baking soda
1 tsp baking powder
1 tsp salt
1 cup chopped nuts (optional)

GLAZE

2 tbsp brown sugar
5 tsp milk
1 tbsp butter
3/4 cup icing sugar
1/4 cup chopped nuts (to sprinkle on top of glazed cake, before glaze cools)

Start with the butter, then the sugar:


Then the eggs, beating after each one.


Then I added the orange juice...note that the orange juice causes the batter to separate but don't panic. As soon as you put the dry ingredients in the batter will come together again nicely. Here is a photo of what it will look like so you won't panic:


And here's what it looks like when you add the dry ingredients (and orange rind and nuts if you so desire) in and keep on beating:


Once your pan is prepared, pour the batter in and place the cake in the oven. It took 45 minutes in my oven (and I have a hot oven) so I would start checking at about that time.


When it comes out of the oven, the toothpick should be clean. Let it cool on the rack in the pan for 15 minutes and then turn it out on to the rack. 

While the cake is cooling you can prepare the glaze.


Let the cake cool entirely before pouring the glaze over the cake.

Here's a photo of the cake after the glaze has been poured on, but before it has hardened (it firms up slightly as it cools). The cake in this photo has no nuts on top as this was the one I made for the kids for school:


I hope you enjoy this delicious cake as much as my family does! 

Update: October 2017

Made this cake again on the weekend for my brother-in-law Simon's birthday and remembered to take a few photos.


Sunday, March 30, 2014

Also Not My Mom's Sour Cream Coffee Cake


Today my dear friend Kelly Z came over for lunch. Kelly and I met in 1994 in Montreal when I first moved into the area known as the Plateau (also known as Mile End - I don't really know where the Plateau stops and Mile End ends, but I digress).

Kelly and I weathered snowy and cold Montreal winters together, stomping up and down St Laurent in our Doc Martens, waiting for that slow, slow bus to crawl up the street from the station south of Sherbrooke, to come and save us from runny noses and salty streets, sometimes a hot bagel would be the reward. There were the sticky hot Montreal summers too - going to see plays at the Fringe Festival to support our friends who were aspiring actors writers and directors, eating dry and salty popcorn at Biftek St Laurent while waiting for a turn at the pool table, doing shots at the Double Deuce while listening to my brother DJ. Shopping at Warshaw for bargains and plants, eating cheese pies at Euro Deli, and dancing to the Tam Tams on Sundays at the base of Mont Royal. There is nowhere better than Montreal in the summer, by the way. As intolerable as the heat and humidity can get, there's always a patio chair available for you to kick back and soak up the rays. As long as you don't mind a cloud of cigarette smoke hanging over your head.

Our friendship persevered through all seasons - Kelly always had a seat at the Passover table when we celebrated with 20 to 30 of our closest friends. I even dragged her to Newfoundland a couple of times, where you can have all four seasons in a single day. She loved it, of course.

Kelly now lives in Toronto and as is the case with most of my friends in Toronto, we don't get to see each other enough. Now, when we plan our get togethers, they always involve food - eating it and talking about it. This date today started as brunch and then morphed into something more lunch-like, because of timing and other things we both had to do in the morning. We had planned a date a few weeks ago but then she got sick and Sam got sick and we decided not to gratuitously spread more germs so we rebooked. On the original date I was planning to serve vegetable soup, Danish rye bread, and something sweet to follow. For today, the menu was black bean soup with avocado and sour cream, corn bread, a nice salad with asparagus, toasted almonds and strong cheddar, and coffee cake to follow.

When I decided to make corn bread to go with the black bean soup, I picked up a really old cookbook my Mom had given to me a long time ago. It's called A Taste of Georgia. We have family on my Dad's side who used to live in Savannah, Georgia and I think my Mom bought this book when we took a family vacation there in the 70s. I have not tried very many recipes from it yet, but it is my reliable book for anything having to with corn bread, and it has some very excellent dip recipes in it.

As I was flipping through it today for a new corn bread recipe to try, I came across a recipe for "quick" coffee cake. What the heck - it looked like it would be a fast mix up so I went for it. I did make a couple of adjustments (as usual). One of them was to add sour cream to the mix instead of just using milk. The recipe follows with my adjustments in brackets.

The reason I titled this post "Also Not My Mom's Coffee Cake..." is that I previously posted a recipe for coffee cake (you can find it here: http://richlerrecipes.blogspot.ca/2011/12/not-my-moms-sour-cream-coffee-cake.html), and that recipe was NOT my Mom's recipe because I could not find it at the time. After making this cake today, I have to say, this one turned out even better than that one (but it's still not my Mom's - one day I will post that one, I promise).

Quick Coffee Cake - Adapted from A Taste of Georgia, recipe contributed by Mrs. Benny N. Grant (Diane)

Preheat the oven to 375 degrees Fahrenheit. Grease an 8"x 12" or  a 9.5" x 9.5" pan. You can use cooking spray if you prefer.

Filling/Topping Ingredients:

*I made this recipe in the quantities as directed, and found that there wasn't enough topping since I left the nuts out. If you are leaving the nuts out, you need to make this recipe larger by 1.5 times. For example, instead of 4 tbsp butter, use 6.

4 tbsp butter, melted
1 cup walnuts, chopped (I left these out so the kids could take the cake to school)
1 cup light brown sugar
4 tbsp flour (I totally forgot this ingredient!!!)
1 tsp cinnamon

Cake Ingredients:

1/4 cup butter, softened
1 cup sugar (I cut this back to 1/2 cup)
2 eggs
1 1/2 cups flour
2 tsp baking powder
pinch salt
1/2 cup milk (I used half milk and half sour cream)

Method:

Cream together the butter and sugar.


Add the eggs, one at a time, and beat after each addition.


Measure the flour, then remove 1/4 of it. Add the baking powder to the 1/4 cup. Set it aside.

Add the pinch of salt to the larger portion of flour. Mix the sour cream and milk together. 


You are going to add the dry and wet mixes into the butter-sugar-egg mixture alternately, beating between each addition. Start with some flour.


Then add some milk/sour cream.


Carry on until you have emptied the flour and the milk/sour cream mix. Then add the 1/4 cup of flour + baking powder that you put aside earlier and beat that in very quickly. Don't over mix. 

Plop some spoonfuls of batter into the prepared pan.


Use a butter knife to spread it around.


Now you need to mix up your filling/topping. This is what it will look like without the nuts (and without the flour - oops!).


Now take some of the filling mixture and crumble it with your fingers onto this first layer of batter.


Don't bother spreading it around because it will be stuck to the first layer of batter and will make a mess (trust me, I tried). It's also unnecessary because during baking it all kind of melts together in a big pan of awesomeness.

Now spoon the next layer of batter on top of the filling mix.


Use your knife to spread it around like you did for round 1 of the batter.


Now add the final crumble of filling/topping. Again, don't try to spread it around as you will end up with a big mess. The oven will take care of it during baking.


Put your lovely pan of delicious goodness into the oven and bake for 25 - 30 minutes. The recipe said 30, I checked at 25 because I have a hot oven. It was ready. Test for doneness by using a wooden skewer - you want it to come out with a few crumbs on it but no wetness.


It looks kind of weird with pits and dents galore. The beautiful thing is that these pits and dents are usually filled with the topping/filling mixture. I call them sugar tunnels. See photo below.


So I recommend you serve this with a nice cup of strong tea, or coffee. You don't need anything else. It's DELICIOUS, moist, sugary, amazing. And it tastes like home.


P.S. The entire cake was eaten by Kelly Z, me, The King of Soup, and our children in about an hour. So I made another one. And this time I remembered to add the flour to the filling/topping mix. In my opinion, it didn't really make much of a difference.


The recipe for the black bean soup mentioned in the story can be found here:
http://richlerrecipes.blogspot.ca/2014/03/normal-0-false-false-false-en-us-ja-x.html

The recipe for the corn bread will be posted today. For your interest, the minestrone recipe is here:
http://richlerrecipes.blogspot.ca/2014/03/really-good-vegetable-soup-with-kick.html

... and the Danish rye bread recipe is here:
http://richlerrecipes.blogspot.ca/2013/06/meretes-danish-rye-bread-from-susan.html

Tuesday, October 30, 2012

Really Good Cake (also known as Chocolate Chip Squares)


My kids and I are currently reading Harriet the Spy – it’s actually our second time reading it together. It’s my copy from when I was a child and it’s falling apart, but that makes us love it even more. In the book, Harriet gets to have cake and milk every day after school. The cake is served to her by the cook, who is not named in the book but is simply called “Cook” (at least it’s capitalized). I didn’t often come home to cake and milk, it was more like an apple or a banana. But there was definitely always something homemade for dessert after supper.

This is one of my favourite cakes from my childhood, and I think my brother would agree. It’s easy to make, and it’s fun for kids because there’s a neat thing to do at the beginning of the baking process. The recipe came from one of my Mom’s friends: Esther Feldman. I still have the piece of paper she wrote the recipe on – it’s probably 40 years old.

As you might have noticed, I sometimes fool around with recipes to try to make them healthier. The only thing I have been able to do with this cake is cut the sugar down. I tried to cut the fat (using applesauce, then trying Greek yogurt) and it just didn’t work – the cake didn’t rise enough and the bottom portion was way too dense. So trust me – just leave this one alone. It’s ok to sin every once in a while.

Ingredients
¾ cup butter (softened)
7 ½ tbsp brown sugar & 7 ½ tbsp white sugar (I just use 10 tbsp brown sugar – no white sugar at all)
1 tsp cold water
1 tsp vanilla
2 eggs
1 ½ cups plus 3 tbsp white flour
¾ tsp baking soda
½ tsp salt
Just over ½ cup cold water
½ cup chocolate chips

Method
Preheat oven to 375 degrees F. Spray a 9” x 9” square pan with cooking spray.


Cream together the butter and sugar (about 2 minutes on high speed). Add the tsp of cold water and the vanilla and beat for about 1 minute. Add the eggs and beat until creamy and light (about 2 minutes). Meanwhile, mix the dry ingredients together.


Add the dry ingredients with the mixer on low speed – stir until flour is just combined, then add the water. Beat for about 2 minutes until nice and light.


Pour into the prepared pan.

Sprinkle the chocolate chips on top. 


Put the cake into the oven for 2 minutes, and then remove it. Use a knife to swirl the chocolate chips into the cake (to give it a marbled effect). 


Put it back into the oven and bake for 30 minutes, or until a toothpick inserted into the centre comes out clean.


Let it cool in the pan. Cut into squares, and enjoy! 


I think you’re going to love it. As you can see by the photo below, my family did.


Friday, June 8, 2012

Birthday Cake


My eldest son turned 9 in the middle of April. It used to be that I would make carrot cake on every single birthday, but now that my kids are a bit older, I let them choose their flavour of cake, and I also let them decorate their own cakes. So as we were getting ready for his big day, I asked the age old question. His response (boy after my own heart), was chocolate.

I pulled out the tried and trusted Better Homes and Gardens cookbook that used to be my Mom’s. It is tattered and torn and full of amazing memories. Each section is tabbed so you can easily locate the type of recipe you seek. At the beginning of each tabbed section is a double page photo spread with sample photos of the recipes inside. I will never, ever forget that Section 9 is for cookies. My brother and I used to look at the photos on these pages a lot. And imagine our Mom making them for us. I don’t think we ever got to try all of them but I can personally vouch for the deliciousness of many of the cookie recipes in this book.


But I digress. We are here to talk about birthday cake.

So I selected a recipe from this book that I have made many times in the past. It is for a basic chocolate cake. For the icing, Noah wanted vanilla. But I decided to make the inside layer of icing chocolate cream cheese, just for fun. He didn’t object.


We made the cake together, as well as the icing - which I personally think adds to the fun of the event, and keeps my kids interested in learning more about cooking and baking. They love measuring things, and manning the mixer. Even though it can get very messy, and sometimes, as in this case, the end product doesn't look very "gourmet", I love every minute of it and so do they.

The King of Soup and I iced the cake when the kids were in bed, and the next morning I let them have at ‘er to decorate it. It was delicious, and let's just say...very colourful.


Ingredients:
2/3 cup soft butter or margarine
1 ¾ cups sugar (I cut this to 1 cup and it still tastes very sweet)
2 eggs
1 tsp vanilla
2 ½ 1 ounce squares unsweetened chocolate, melted and cooled
2 ½ cups sifted cake flour (I use all purpose flour)
½ cup unsweetened cocoa powder (the recipe doesn’t call for this – I add it for extra fudgey goodness)
1 ½ tsp baking soda
½ tsp salt
1 ¾ cups ice water

Directions:
Quoting directly from the book:

“Cream together butter, sugar, eggs and vanilla till fluffy (beat 5 minutes at high speed on mixer, scraping bowl occasionally to guide batter into beaters, or beat 5 minutes by hand (Editor’s note: yeah right - could anyone beat by hand for 5 minutes?). Blend in chocolate.


Sift flour with soda and salt (Editor’s Note: add cocoa powder at this point as well); add to creamed mixture alternatively with ice water; beat after each addition.


Bake in 2 paper-lined 9x11 ½ inch round pans in moderate oven (350o) 30 – to 35 minutes or till done. “

As you can see, I didn't line the pans with paper. I sprayed them with cooking spray instead and it worked just fine.


Remove cakes from the oven when a toothpick inserted in the centre comes out clean. Cool in pans on a wire rack for about 2 minutes, then turn each pan over to release the cake. Let cool completely on wire rack.


Note: Don’t try to ice the cake until it is completely cooled or you will end up with icing soup.

Icings:

Vanilla Icing:
1/3 cup butter
4 ½ cups sifted icing sugar
¼ cup milk
1 ½ tsp vanilla
Additional milk as required

Cream the butter and sugar together. Add vanilla and milk. Cream together until of desired consistency.

Chocolate Cream Cheese Icing:
2 oz light cream cheese
1 tbsp butter
1 ½ cups icing sugar
1 tsp vanilla
¼ cup unsweetened cocoa powder
Pinch salt

Cream the cream cheese, butter and sugar together. Add the cocoa powder. Add the vanilla and the salt. Cream together until of desired consistency.


Have fun singing!!!